- 2020
- 12/10
Ionic Vueでアプリがエミュレータ上で起動するまでやってみる
IonicというJavascriptやCSSでスマホ・デスクトップアプリを作成するフレームワークがあるのですが、2020年10月にVueがサポートされるようになりました。
スマホアプリをつくりたいと思い続けて早XX年…これなら私の技術でもできるのでは?と思い、Android Studioのエミュレーターで動くところまでをやってみました。
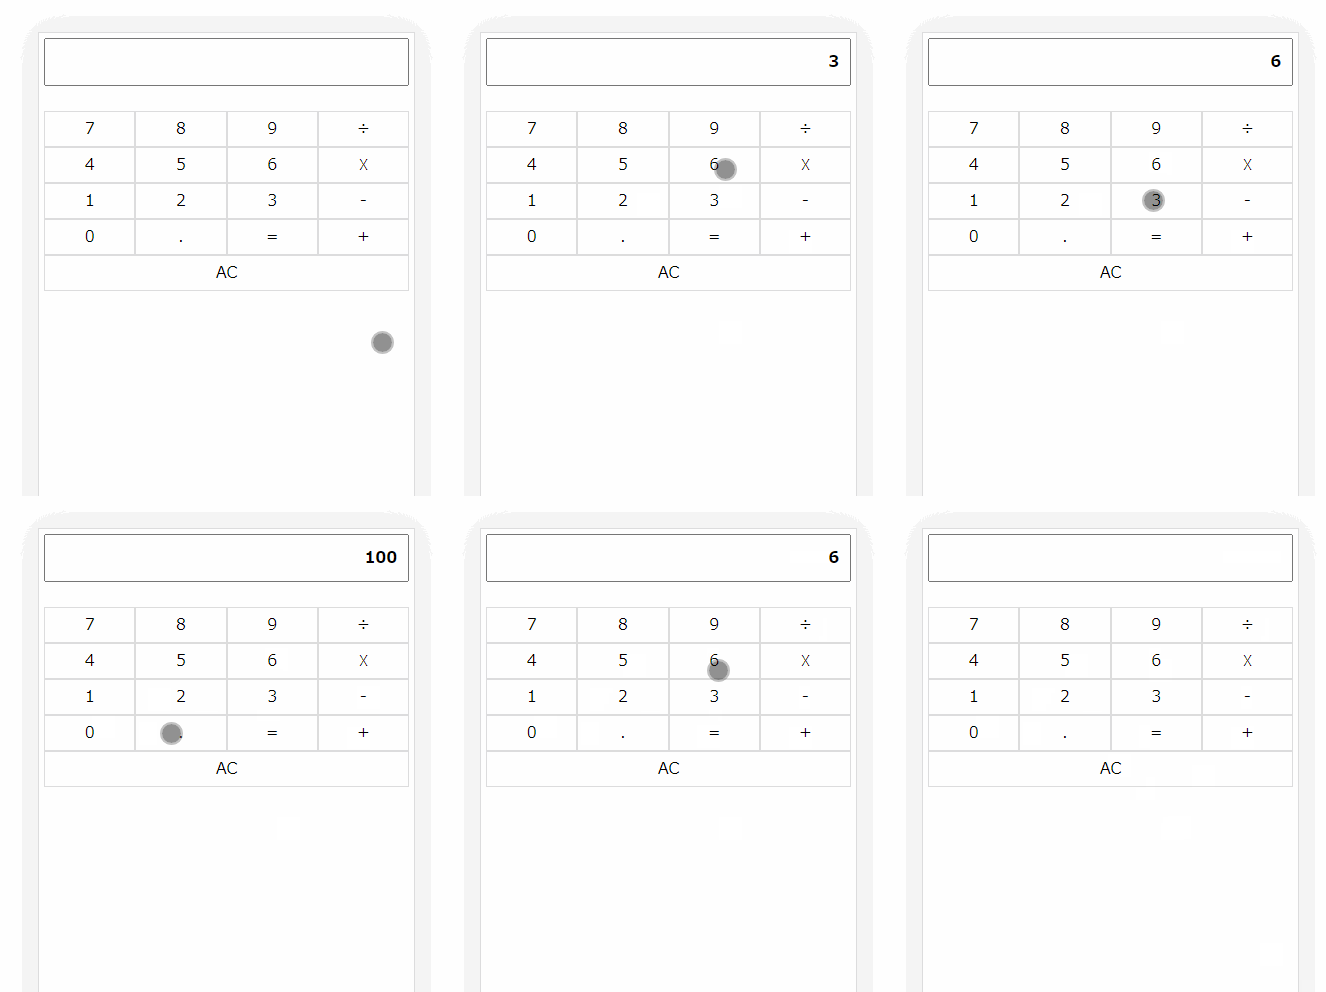
簡単な電卓を作ってみました。
ADs
事前準備
Visual Studio Codeでコードを書き、Android Studioでビルドとエミュレータによる動作確認を行います。
なのでVSCodeとAndroid Studio、CLIツールのインストールでnpmを使用するのでNode.jsをインストールしておきます。
※Windowsを使用しています。
プロジェクトのセットアップ
まずはCLIツールをインストールします。
|
1 |
npm install -g @ionic/cli@latest |
インストールが完了したらVSCodeのターミナルを開いて作業フォルダに移動し、
|
1 |
ionic start |
と入力します。
そうするとカレントフォルダ配下にプロジェクト名でフォルダが作成され、その後は対話型で初期設定を進めていくことができます。
まずはFrameworkを選択します。ここでVueを選びます。
|
1 2 3 4 5 6 7 |
Please select the JavaScript framework to use for your new app. To bypass this prompt next time, supply a value for the --type option. ? Framework: (Use arrow keys) > Angular | https://angular.io React | https://reactjs.org Vue | https://vuejs.org |
プロジェクト名を入力します。フォルダの名前にもなります。
|
1 2 3 4 5 6 |
Every great app needs a name! Please enter the full name of your app. You can change this at any time. To bypass this prompt next time, supply name, the first argument to ionic start. ? Project name: |
初期テンプレートを4種類から選びます。
ここではblankを選択します。
|
1 2 3 4 5 6 7 |
the second argument to ionic start. ? Starter template: (Use arrow keys) > tabs | A starting project with a simple tabbed interface sidemenu | A starting project with a side menu with navigation in the content area blank | A blank starter project list | A starting project with a list |
ここまで進むと現在のフォルダ配下にプロジェクト名のフォルダが作成され、ファイルをダウンロードしたり展開したりといった初期化の作業が進みます。
かなり時間がかかるのでお茶でも飲みながら気長に待ちます。
最後になんかのアカウントを作るか聞かれますが、とりあえずNで。
(何のアカウントなのか後日調べてみます)
|
1 2 3 4 |
Connect with millions of developers on the Ionic Forum and get access to live events, news updates, and more. ? Create free Ionic account? (y/N) |
ここまで進むとプロジェクト名でフォルダが作成され、最低限のファイルが用意された状態になります。
プロジェクトフォルダを開いて編集作業を進めていきます。
コードを編集する
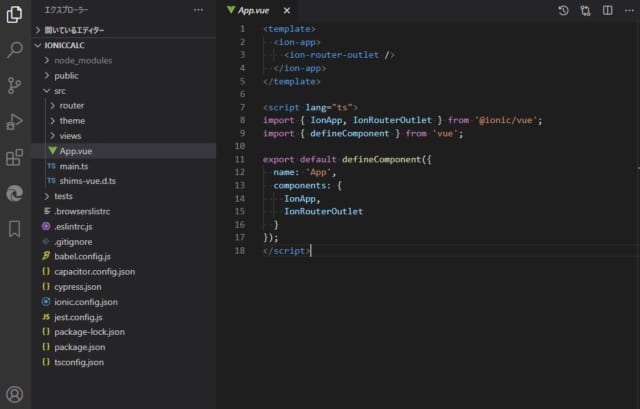
フォルダ構成はこういう感じになっています。
Vueのプロジェクトとほぼ同じなので理解しやすいと思います。
ターミナルで
|
1 |
ionic serve |
と入力すると、サーバーが起動してブラウザが開きます。
編集した内容が即座に反映されブラウザがリロードされる(ホットリロード)にも対応しています。
※中身はVue CLIのnpm run serveと同じです。
このHomeコンポーネント(Home.vue)を編集して簡単な電卓をつくってみます。
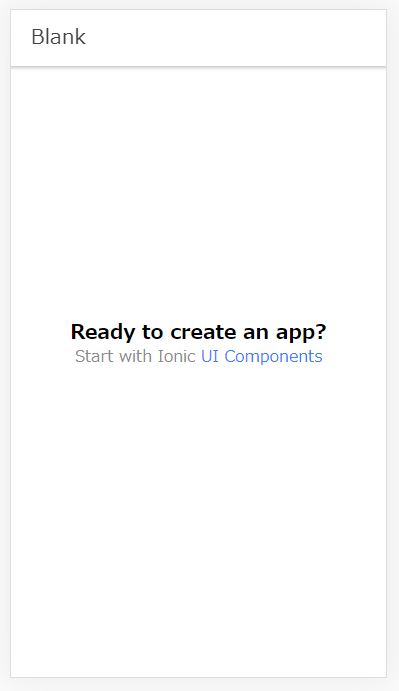
Home.vueは初期の段階では以下のようになっています。
Ionic Vue独自のタグ(コンポーネント)がありますが、どういう意味なのか名前からでも想像できると思います。
|
1 2 3 4 5 6 7 8 9 10 11 12 13 14 15 16 17 18 19 20 21 22 23 24 25 26 27 28 29 30 31 32 33 34 35 36 37 38 39 40 41 42 43 44 45 46 47 48 49 50 51 52 53 54 55 56 57 58 59 60 61 62 63 64 65 66 67 68 |
<template> <ion-page> <ion-header :translucent="true"> <ion-toolbar> <ion-title>Blank</ion-title> </ion-toolbar> </ion-header> <ion-content :fullscreen="true"> <ion-header collapse="condense"> <ion-toolbar> <ion-title size="large">Blank</ion-title> </ion-toolbar> </ion-header> <div id="container"> <strong>Ready to create an app?</strong> <p>Start with Ionic <a target="_blank" rel="noopener noreferrer" href="https://ionicframework.com/docs/components">UI Components</a></p> </div> </ion-content> </ion-page> </template> <script lang="ts"> import { IonContent, IonHeader, IonPage, IonTitle, IonToolbar } from '@ionic/vue'; import { defineComponent } from 'vue'; export default defineComponent({ name: 'Home', components: { IonContent, IonHeader, IonPage, IonTitle, IonToolbar } }); </script> <style scoped> #container { text-align: center; position: absolute; left: 0; right: 0; top: 50%; transform: translateY(-50%); } #container strong { font-size: 20px; line-height: 26px; } #container p { font-size: 16px; line-height: 22px; color: #8c8c8c; margin: 0; } #container a { text-decoration: none; } </style> |
コンポーネントについては公式ページの解説が分かりやすいです。
これを編集してこうなります。
(電卓の部分は本題ではないので参考程度ということで…。)
|
1 2 3 4 5 6 7 8 9 10 11 12 13 14 15 16 17 18 19 20 21 22 23 24 25 26 27 28 29 30 31 32 33 34 35 36 37 38 39 40 41 42 43 44 45 46 47 48 49 50 51 52 53 54 55 56 57 58 59 60 61 62 63 64 65 66 67 68 69 70 71 72 73 74 75 76 77 78 79 80 81 82 83 84 85 86 87 88 89 90 91 92 93 94 95 96 97 98 99 100 101 102 103 104 105 106 107 108 109 110 111 112 113 114 115 116 117 118 119 120 121 122 123 124 125 126 127 128 129 130 131 132 133 134 135 136 137 138 139 140 141 142 143 144 145 146 147 148 149 150 151 152 153 154 155 156 157 158 159 160 161 162 163 164 165 166 167 168 169 170 171 172 173 174 175 176 177 178 179 180 181 182 183 184 185 186 187 188 189 190 191 192 193 194 195 196 197 198 |
<template> <ion-page> <ion-header :translucent="true"> <ion-toolbar> <ion-title>電卓</ion-title> </ion-toolbar> </ion-header> <ion-content :fullscreen="true"> <ion-header collapse="condense"> <ion-toolbar> <ion-title size="large">電卓</ion-title> </ion-toolbar> </ion-header> <div id="container"> <ion-input :value="currentInput" readonly></ion-input> <ion-grid> <ion-row> <ion-col size="3" @click="calc(7)">7</ion-col> <ion-col size="3" @click="calc(8)">8</ion-col> <ion-col size="3" @click="calc(9)">9</ion-col> <ion-col size="3" @click="calc('/')">/</ion-col> <ion-col size="3" @click="calc(4)">4</ion-col> <ion-col size="3" @click="calc(5)">5</ion-col> <ion-col size="3" @click="calc(6)">6</ion-col> <ion-col size="3" @click="calc('*')">*</ion-col> <ion-col size="3" @click="calc(1)">1</ion-col> <ion-col size="3" @click="calc(2)">2</ion-col> <ion-col size="3" @click="calc(3)">3</ion-col> <ion-col size="3" @click="calc('-')">-</ion-col> <ion-col size="3" @click="calc(0)">0</ion-col> <ion-col size="3" @click="calc('.')">.</ion-col> <ion-col size="3" @click="calc('=')">=</ion-col> <ion-col size="3" @click="calc('+')">+</ion-col> <ion-col size="6" @click="calc('C')">C</ion-col> <ion-col size="6" @click="calc('AC')">AC</ion-col> </ion-row> </ion-grid> </div> </ion-content> </ion-page> </template> <script> import { IonContent, IonHeader, IonPage, IonTitle, IonToolbar, //追加 IonGrid, IonRow, IonCol, IonInput, } from "@ionic/vue"; import { defineComponent } from "vue"; export default defineComponent({ name: "Home", components: { IonContent, IonHeader, IonPage, IonTitle, IonToolbar, //追加 IonGrid, IonRow, IonCol, IonInput, }, data() { return { currentInput: 0, beforeInput: 0, calcKey: null, calcFlg: false, }; }, methods: { calc(i) { //小数点がある場合、2度めの小数点は無効 if (i == "." && this.currentInput.indexOf(".") !== -1) { return; } //数字か小数点 if (isFinite(i) || i == ".") { //加減乗除を押されたあとの入力 if (this.calcFlg) { this.calcFlg = false; this.currentInput = 0; } let current = this.currentInput + i.toString(); if (current.charAt(0) == 0 && current.charAt(1) != ".") { current = current.slice(1); } this.currentInput = current; return; } //加減乗除 if (i == "+" || i == "-" || i == "*" || i == "/") { if (this.beforeInput) { this.equal(); } this.calcKey = i; this.calcFlg = true; this.beforeInput = this.currentInput; return; } //イコール if (i == "=" && this.beforeInput) { this.equal(); this.calcFlg = true; this.beforeInput = 0; this.calcKey = null; return; } //AC if (i == "AC") { this.currentInput = 0; this.beforeInput = 0; this.calcKey = null; this.calcFlg = false; } //C if (i == "C") { this.currentInput = 0; } }, //計算を行う equal() { switch (this.calcKey) { case "+": this.currentInput = parseFloat(this.beforeInput) + parseFloat(this.currentInput); break; case "-": this.currentInput = parseFloat(this.beforeInput) - parseFloat(this.currentInput); break; case "*": this.currentInput = parseFloat(this.beforeInput) * parseFloat(this.currentInput); break; case "/": this.currentInput = parseFloat(this.beforeInput) / parseFloat(this.currentInput); break; } }, }, }); </script> <style scoped> #container { max-width: 600px; margin: auto; } ion-input { font-weight: 700; text-align: right; border: 2px solid #bbb; margin: 20px 5px 10px; padding: 0 10px !important; box-sizing: border-box; width: calc(100% - 10px); font-size: 1.25rem; } ion-row { border: 1px solid #ddd; } ion-col { padding-top: 20px; padding-bottom: 20px; text-align: center; border: 1px solid #ddd; transition: 0.25s background; } ion-col:hover { background: rgb(255, 237, 237); } ion-col:active { background: rgb(255, 183, 183); } ion-title.title-large { align-items: center; } </style> |

スマートフォン向けにビルドする
ionic serveが動いている場合はCtrl+Cで監視を終了します。
次に、
|
1 |
ionic build |
と入力し、プロジェクトをビルドします。
これでdistフォルダが生成され、その中にビルドされたhtmlやjsファイルが生成されます。
Webの場合はこのdist内をサーバーにUPすれば出来上がりですが、スマホアプリの場合は以降の作業が必要です。
|
1 |
ionic cap add android |
と入力します。
これでプロジェクトフォルダ内にandroidというフォルダが作成され、中にアプリのビルドに必要なファイルが生成されます。
次に
|
1 |
ionic cap open android |
と入力すると、Android Studioが起動します。

Android Studioの実行ボタン(Run)をクリックすることで、Androidのエミュレーターが起動し、表示を確認できます。
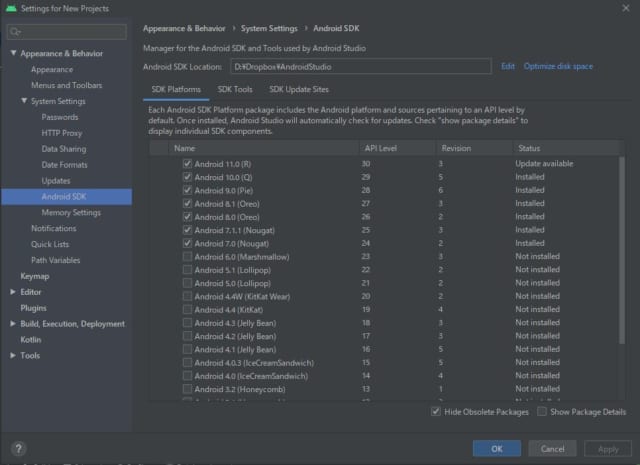
もし起動ボタンが押せない場合、Tools→SDK ManagerのSDK Platforms内で使用するAndroidがインストールされているか確認します。
使用するAndroidのバージョンはandroidフォルダ内のvariables.gradleを見ると確認できます。
|
1 2 3 4 5 6 7 8 9 10 11 12 13 14 15 16 17 |
ext { minSdkVersion = 21 compileSdkVersion = 29 //この例だと29(Android 10.0)がインストールされている必要がある targetSdkVersion = 29 androidxAppCompatVersion = '1.1.0' androidxCoreVersion = '1.2.0' androidxMaterialVersion = '1.1.0-rc02' androidxBrowserVersion = '1.2.0' androidxLocalbroadcastmanagerVersion = '1.0.0' androidxExifInterfaceVersion = '1.2.0' firebaseMessagingVersion = '20.1.2' playServicesLocationVersion = '17.0.0' junitVersion = '4.12' androidxJunitVersion = '1.1.1' androidxEspressoCoreVersion = '3.2.0' cordovaAndroidVersion = '7.0.0' } |
今回はここまで
エミュレータ上ではありますがひとまずアプリとして動くところまでできました。
普段使っている技術の延長でスマホアプリを作れるというのは素晴らしいです。新しいことを覚えるのは大変ですから…。
通知などスマホ独自の機能の実装やGoogle Play Storeへの公開、iOS向けのビルドなど手こずりそうな部分はまだたくさんありそうですが、運営しているサイトをスマホアプリとしてリリースするようなこともできればいいなと思います。引き続きがんばります。
参考になりました
公式ドキュメント
日本語に翻訳済みでドキュメントが丁寧なので導入部分はすんなりできました。
Ionic-Vueでスマホアプリを作る本
私はここまで追いついてないので…今後がんばります。
ADs
Related Articles関連記事
Comments
コメントはまだありません。


